Using a SPA112 or SPA122 as a Fax Interface
 Fax machines typically uses an RJ11 or regular phone line for
connecting. This connection that then needs to go to a RJ45
Ethernet connection (RJ11 TO RJ45). When you want to integrate an existing
fax machine to an IP-PBX, you will need to convert the analog fax line to an
Ethernet or RJ45 connection. One way to implement this is to use an ATA
(Analog Telephone Adapter) such as, a Cisco
SPA122, SPA112 ATA, or a Cisco/Linksys PAP2T which will accept an analog RJ11
phone connection from the fax machine using one of the Phone Port
connections (Line 1 or Line 2).
Fax machines typically uses an RJ11 or regular phone line for
connecting. This connection that then needs to go to a RJ45
Ethernet connection (RJ11 TO RJ45). When you want to integrate an existing
fax machine to an IP-PBX, you will need to convert the analog fax line to an
Ethernet or RJ45 connection. One way to implement this is to use an ATA
(Analog Telephone Adapter) such as, a Cisco
SPA122, SPA112 ATA, or a Cisco/Linksys PAP2T which will accept an analog RJ11
phone connection from the fax machine using one of the Phone Port
connections (Line 1 or Line 2).
You would typically mount the SPA112 or SPA122 in the phone closet near the Asterisk server using the RJ11 phone line already in place back to the fax machine. The Ethernet connection would connect into the switch, connecting back to the Asterisk server as an extension.
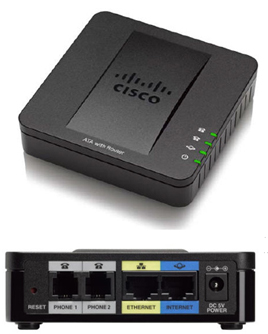 The
Cisco SPA122 offers two analog ports
The
Cisco SPA122 offers two analog ports
Configurations for PAP2T/SPA122* for Best Fax Results
After connecting the ATA as the analog gateway device and making sure adequate bandwidth exists, you may want to take advantage of some of the configuration changes that will help ensure the most reliable result when faxing. *Ensure that your device is running the latest firmware.
- Select Voice in the Menu Bar, and then select either Line1 or Line 2 depending on which line you have used for your fax. Then select Network. Set the Network Jitter Level to very high and the Jitter Buffer Adjustment to no.
- Next, in the Supplementary Service Subscription section, select the following settings; Call Waiting Serv to no and the Three Way Call Serv to no.
- Navigate to the Audio Configuration section and enter the following settings to support T.38 Fax Preferred Codec; G.711u (USA) or G.711a (rest of the world). Select Use pref. codec only as yes, Silence Supp Enable as no, Echo Canc Enable as no and FAX Passthru Method as ReINVITE.
- Click Submit to save your settings
- Since you are using the Cisco media gateway for PSTN termination;
then disable T.38 (fax relay) and enable fax
using modem passthrough. For example:
modem passthrough nse payload-type 110 codec g711ulaw. Next set fax rate to disable and fax protocol pass-through to g711ulaw
Note: If a T.38 call cannot be set-up, then the call automatically reverts to G.711 fallback. - You'll want to verify that your fax machine BAUD rate is set to a speed between 7200 and 14400. We suggest 9600. Then try to fax, as a test, and make sure it completes correctly.
Use this code in your ATA Configuration file:
<FAX_V21_Detect_Enable_1_>Yes</FAX_V21_Detect_Enable_1_>
<FAX_CNG_Detect_Enable_1_>Yes</FAX_CNG_Detect_Enable_1_>
<FAX_Passthru_Method_1_>ReINVITE</FAX_Passthru_Method_1_>
<FAX_Enable_T38_1_>Yes</FAX_Enable_T38_1_>
<FAX_Tone_Detect_Mode_1_>caller or callee</FAX_Tone_Detect_Mode_1_>